The Foreign Language of Sewing
Sewing has its own language and rhythm that has surprising uses for prototyping.
The Foreign Language of Sewing

One of the special skill sets I love being able to utilize at Delve and for projects at home is sewing.
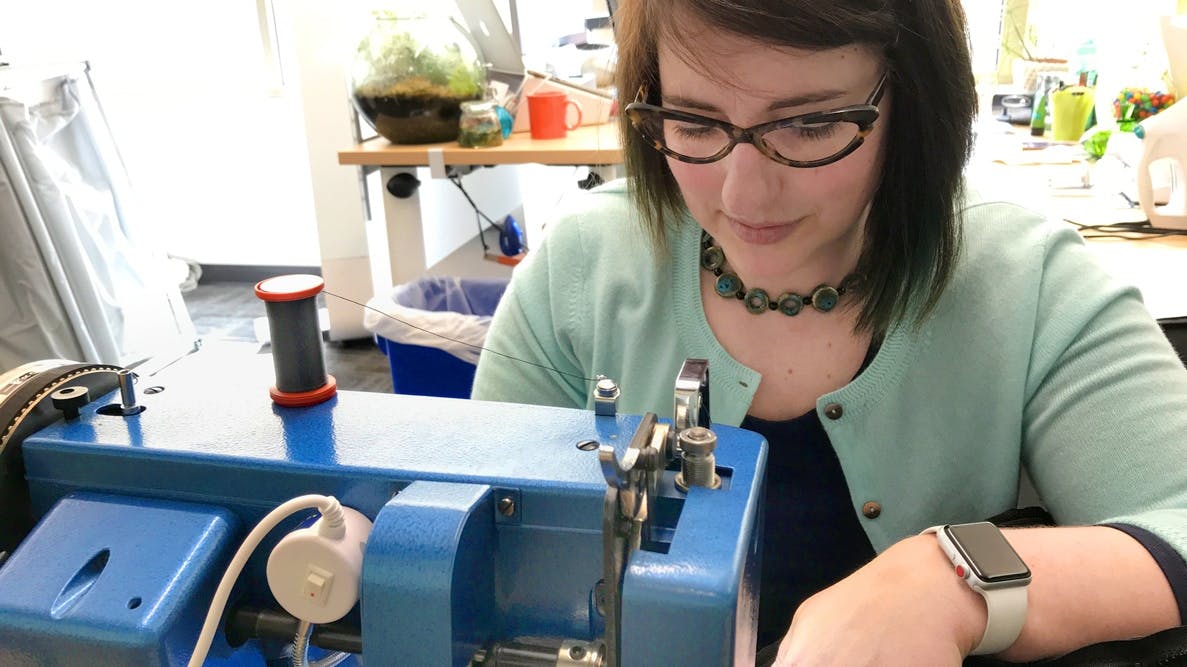
It’s not only a helpful tool for altering clothing that never fits quite right off-the-rack but allows me to support the design process when soft goods or working with fabric and flexible textiles is called for. I incorporated soft-goods design into my Masters of Industrial Design thesis project in the form of a custom backpack. I made my own non-traditional wedding dress (red seersucker and teal crinoline). I have hemmed many curtains and created other home goods, cosplay, and handbags when the inspiration to create hits. I love when I get the opportunity to break out our industrial sewing machine (I named it Ferdinand) to produce fabric-based prototypes for the products our design and engineering teams are working on for our clients.
I learned the basics of how to sew early in my life. My mom and grandmothers made many outfits and costumes for me. Watching them use the odd tools, complex machines, read foreign language patterns to make something I can wear from rectangles of fabric was amazing! I have fond memories of hours of lovingly cutting out pattern pieces on the floor and listening to the hum of the machine together with my mom, Heidi. She taught me the first few steps that everyone should know how to do and the more complicated steps of reading a pattern later.
Sewing is a foreign language
Sewing has its own language with words like seam-allowance, weft, bobbin, feed-dog, presser-foot, pleat, dart, ease, baste, grainline, and interfacing. Just like learning a language, you don’t learn everything all at once. You pick up definitions little by little as you choose different items to make. YouTube continues my education when I have questions about specific construction techniques or adaptations I want to make to customize my projects.
Here’s how to start learning the foreign language of sewing:
First – get to know your fabric What’s it made of and how does it behave? Is it stretchy? Can you iron it? What is the right-side vs. the reverse-side? Start with something simple like cotton or another non-stretch material and you’ll be much happier with the result.
Second – get to know your machine! Now that you know what fabric you’re working with, you can choose a thread (usually poly/cotton blends) to work with. Threading a bobbin is next. Threading a machine can be complicated. There are a certain set of steps to follow in order to feed the thread through a series of loops, holes, plates and gaps to ensure the stitches will be tensioned correctly and make the stitches work. Newer machines have auto threaders, but I prefer my 1969, maroon, Viking Husqvarna because, I feel like going through all those steps is like performing a secret hand-shake with your machine before you start! It’s also helpful because I know what might be going wrong if stitches skip or another problem starts.
Third – get to know the types of stitches, seams and how your clothes “work”! The basic stitches you’ll see are straight-stitches and zig-zag stitches. The stiches that you find on the hem of a T-shirt are made by a serger or overlock machine. That’s a whole different kind of animal. Stick with straight and zig-zag for now.
Fourth – get to know your tools! Sewing tools can be as simple as a pair of “fabric-only” scissors, pins and a measuring tape. They can also look like odd and complicated surgical devices. My essentials are the seam ripper, shears, snips, long pins, flexible measuring tape, sewing gauge, and most importantly, your iron. It may seem like an extra step to iron before you sew but setting the hem with the iron is essential for a good outcome. If you don’t you’re more likely to have mis-cuts, puckering, and a wobbly hem and you’ll have to get your seam ripper out and do it all over again!
Epic winter coat project
The advanced techniques of pattern reading and construction came later with a lot more practice and a lot of time spent making lots of mistakes to use my seam-ripper on. I finally felt ready to tackle a big and complicated pattern. My ambitious project to create a winter coat with some features I couldn’t find in off-the-shelf coats started last summer. I wanted a coat I could walk to work in on sub-zero-degree days, but not be too heavy for the “warmer” days when it was a balmy 20 outside. I also wanted to add some special features to solve the perpetual problem of “what do you do with all of the stuff you need outside when you get inside,” so I added back-pack straps. I also wanted to wear a non-black/neutral color to cheer me up in the depths of Wisconsin winter.
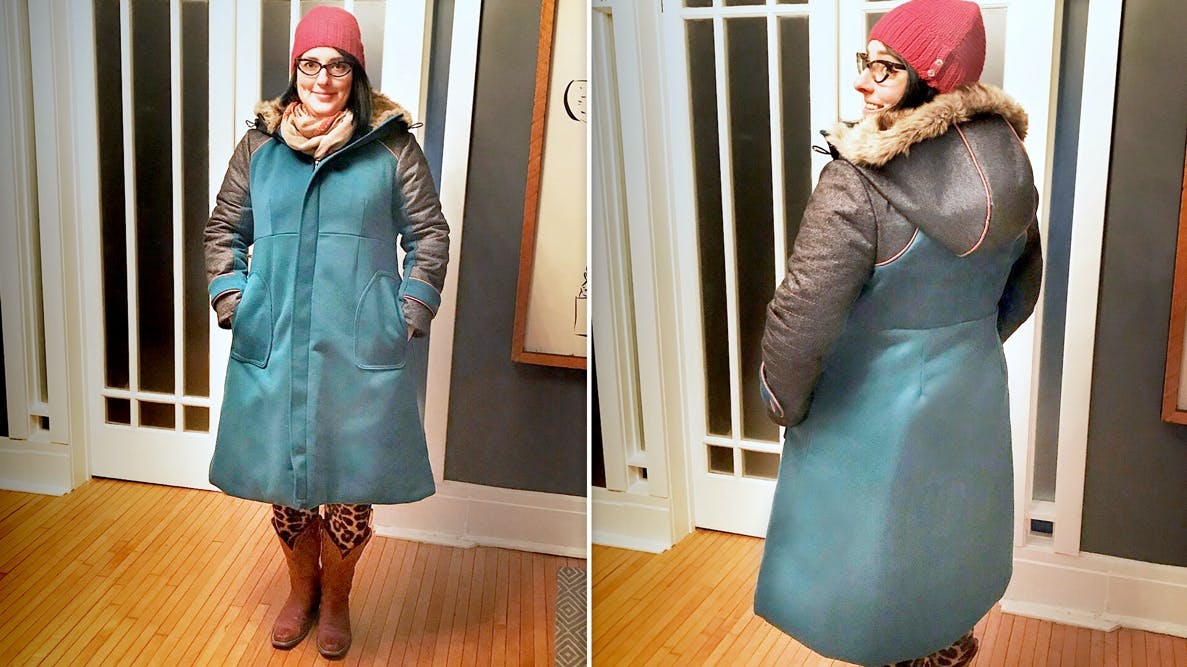
The whole project took me about a month and a half. About three weekends of non-stop construction dedicated time and a bit in the evenings after work. I purchased the fabric on Mood's website because I wanted to be on my own, personal Project Runway. Choosing fabric is really difficult because, although there are an incredible variety of fabrics, I was looking for a combination of features and colors that were tough to find. I ended up choosing a new material that was a turquoise jersey backed with a traditional wool coating. I found a contrasting red color for the quilted lining and a satin for the sleeve area because I wanted my clothing to flow through without bunching/catching. I also found a special gray suiting fabric to function as waterproofing on the hood, yolks and sleeves. I walk to work and it’s often dark when I leave in the winter, so I included some reflective piping that I made of a reflective material that came in red. I ordered some Thinsulate inner lining to make sure the coat was warm enough for the sub-zero-degree temperatures my puffy coat just didn’t work in. Finally, I found the notions needed for finishing the coat through a local fabric store, Amazon and Etsy. I needed a long zipper, elastic, rivets, and toggles for the hood, buttons for the sleeve, smaller zippers for the pockets and topstitching thread.
I purchased the digital pattern from a seller on Etsy called WafflePatterns. I love the shape of the coat and the details of the hood and sleeves. With a PDF pattern you can select only your sizes to show before you print so, it’s easier to follow the lines when cutting out the pieces. I altered the pattern a bit so that it suited my measurements (different size up top and on the bottom) another benefit of making a custom piece instead of being limited to the stock sizes at the store. I also lengthened the bottom of the coat, which requires a “slash” technique to add/remove length while keeping the right proportion of the piece rather than just adding inches to the bottom edge, which can result badly in the final drape of the garment.
The pattern required 22 pieces to be cut out and I added a removable, faux fur inner lining so that increased the number to 34. The construction process was helped by following the pattern instructions along with a sew-along blog that I found on SewNews lead by Rhonda Buss. There were some very complicated steps I had not done before like an inner sleeve lining, making a hood, finishing the top-stitched edge through really thick fabric, and I needed a refresher on making piping. It was fun to see each part come together and to have the extra guidance and clarification of the pattern through the sew-along blog. I made a few mistakes with the sleeves and had to create the pockets twice because, the fabrics I chose were too thick to construct as they had in the pattern. That’s sewing!
I’m happy with the outcome overall and it did keep me warm this winter. I learned a lot through the process and am looking forward to the next project (because I ordered too much fabric!). I may try one of the shorter jackets Waffle Patters has on their site. My mom was impressed, and I think my grandma would have been very proud of my efforts. I thought of her often while I used many of the tools and her sewing kit she left me. She would have said, “Oh Corin, what a lovely col-ah [color in her accent].” And told me more about the tailoring courses she took after she attended Bates College in Massachusetts.
Since completing my winter coat, I have enjoyed working on several soft-goods projects for clients at Design Concepts. Technical materials for outdoor fabrics are an area I am learning more about and Ferdinand, our Sailrite industrial sewing machine, is ready for the next project if anyone out there needs some help prototyping. Our machine’s namesake, Ferdinand Magellan, is due to the Sailrite’s typical use for making sails and other boating textiles and because, Ferdinand the Bull can get through 10 thick layers of canvas. I also think it’s appropriate because, learning to sewing is a journey. I encourage everyone to learn enough to appreciate the construction of the fabric items you wear, carry, and use every day.
Remember, right-sides together, always iron your folds, and watch the edge, not the needle!